How to install and uninstall fonts on a Mac OS computer
You already know how to install fonts on a Mac computer, luckily for Mac users, the process is pretty easy. You don’t need to be a tech expert to download, install, preview, and enable new fonts on Mac. There is no need for any tips to install fonts, all you need is a few simple steps as guided below in this article.
1. Where and how to download fonts.
Before you install new fonts on your Mac, you’ll need to find and download them on your Mac. There are many sources of fonts online. Most are free, of course, if you want you can buy fonts from a paid source.

2. Here are some font sources that you should consult:
MyFonts (https://www.myfonts.com) – Here you can find hundreds of fonts for Mac both royalty free and free.
Google Fonts (https://fonts.google.com) – This is a rich collection of free fonts for Mac.
FontSquirrel (https://www.fontsquirrel.com) – Search and review hundreds of free fonts for Mac.
1001 Free Fonts (https://1001freefonts.com) – There are more nicer fonts for Mac, free for personal use.
Note:
– When downloading free fonts, you should use them for private projects, you cannot legally use them for commercial projects.
When searching for new fonts for Mac, make sure the fonts you choose are compatible with macOS. Very easy to test. Look at the filename and if it ends with “.ttf” or “.otf” or “.ttc” then those are the fonts you need.
Once you find the fonts you like, download them like any other file. Usually the font is in compressed .zip files that you can extract by double clicking on the Mac.
Once the files with the new fonts are downloaded on your Mac, it’s time to install them.
3. How to install fonts on a Mac using Font Book.
The easiest (and recommended) way to add fonts to a Mac is to use Font Book, a font management app that comes pre-installed on all Macs.
You can install fonts for your account, for all accounts on your Mac, or for an entire network. Depending on what you need, the process will be slightly different.
3.1 How to install fonts for your account.
– If you only need to install new fonts for your account, follow these steps:
– Use Finder to locate a folder with new Mac fonts.
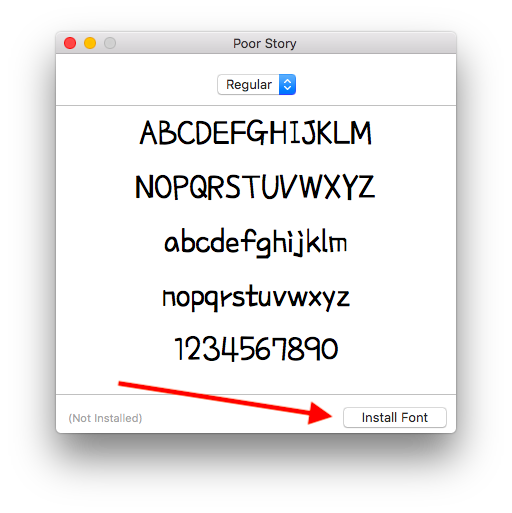
– In this folder find the file ending in “.ttf” or “.ttc” or “.otf” and double click on it, it will automatically run Font Book for you.
– Click Install Fonts and you’re done.
Here’s all you need to get started using the newly downloaded and installed fonts on your Mac.

3.2 How to set up fonts for all accounts on a Mac.
If you have multiple accounts on your Mac and you want to use the downloaded font for all accounts, a few extra steps are needed.
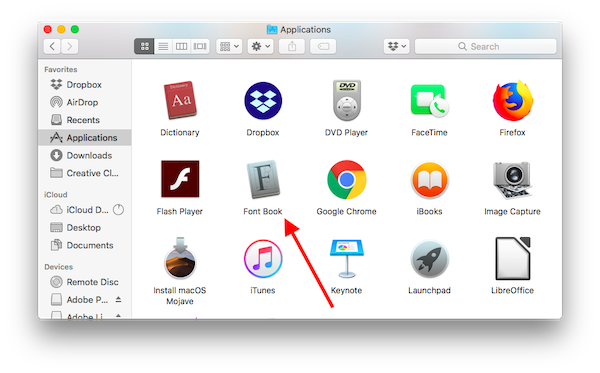
- Use Finder or Spotlight to find and launch Font Book.
- Go to the apps menu bar at the top and click on Font Book → Preferences.
- Use the drop-down to change the default location from User to Computer.
- Find and open the folder of a new font you want to add.
- In this folder, double-click a file that ends with “.ttf” or “.ttc” or “.otf.”
- Click the install “Install Font” button on the Font Book pop-up window.
Congratulations! The new font has just been added to the System-wide Fonts folder, which means you can use it from any account on your Mac.
The new font has just been added to the System-wide Fonts folder, which means you can use it from any account on your Mac.
* How to install fonts for all network users
To install fonts for everyone on your network, you need to be the network administrator or have this person do it for you. To make the new fonts available to all network users, those fonts must be copied to the network’s Mac fonts directory: Network / Library / Fonts.
3.3 How to manually install fonts on a Mac
You don’t have to use Font Book to install new fonts on a Mac. You can also do this manually by copying the font file to Library / Fonts.
But starting with OS X 10.7, the Library folder and all its subfolders have been hidden from the user’s view. You’ll need a few extra actions to locate and access it:
- Open Finder and click on the “Go” section in the menu above.
- Navigate to Go to “Go to Folder” in the drop-down menu and click on it.
- Type the text “~ / Library / Fonts” in the pop-up window and click “Go”.
- The Fonts Folder folder will be displayed.
- Drag and drop the extracted font file into the Fonts folder.
- Great, that’s it, now you also know how to add Mac fonts manually.
4. How to preview fonts on Mac
With so many cool Mac fonts, it’s not always easy to choose the right font for your business project or personal needs. That’s where font previews are made before you intend to use them.
The best way to preview new fonts for Mac is to use the Font Book app:
- Go to Finder → Applications → Font Book or use Spotlight to find and run Font Book.
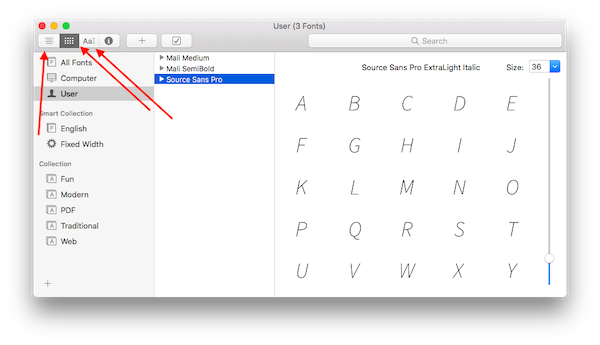
- Click the font you want to preview (fonts are listed in the center column of the window).
- The preview will show up in the right part of the window.
- To switch between different previews, click on the lines, grids, or letter-like buttons in the top left corner of the window.
5. How to remove and delete fonts on a Mac
There are many fonts for Mac installed that offer a lot of styling options, but too many fonts have the opposite effect – that makes choosing the right one and harder, ultimately, leading to clutter on the machine Mac.
That’s why knowing how to effectively manage fonts on a Mac is as important as knowing how to install them. To avoid system clutter, we recommend disabling or completely removing fonts you don’t use.
Note that you are not allowed to remove or disable system fonts. You can only manage the fonts that you have added.
So you have two options: disable and delete.
5.1 Delete fonts on Mac: This means deleting them from your system. If you need to remove the following fonts, you will have to reinstall. To remove fonts on a Mac, do the following:
- Open Font Book.
- Select the font you want to remove.
- Press the “Delete” key.
- Click “Remove” on the pop-up.
5.2 Disable fonts on Mac: This means they will remain in your system but will no longer be listed in the Fonts window or apps. To disable fonts on Mac, do the following:
- Open Font Book.
- Select the Font you want to disable.
- Find the “Disabled” button at the top and click it.
- Click “Disable” on the pop-up.
Now you know everything you need to efficiently download, install, and manage new fonts on your Mac. Hope this will give you more room for creativity and experimentation while working on your Mac.
Article referenced at: https://mackeeper.com/blog/how-to-install-fonts-on-mac/


Your comment