Install and use 7 ZIP on Ubuntu Linux
7-Zip is a file archiver with a high compression ratio.

It is powerful and faster.
I love 7 Zip because it help my work.
7-Zip is a file archiver with a high compression ratio.
It is powerful and faster.
I love 7 Zip because it help my work.
You already know how to compress a file using 7 zip, compared to similar software, compressing the file with 7 zip is not difficult, after only a few steps, you will have the result.
If you're a Windows user and you've sent / received large files over the Internet, you probably haven't heard of the 7 Zip file compression tool. Installing 7 Zip on Windows is quite simple, so what about Ubuntu Linux. Let's find out how to install and use 7 Zip on Ubuntu Linux.
In addition to the 7z format, the 7 ZIP tool also supports compression of other file formats such as XZ, BZIP2, GZIP, TAR, ZIP and WIM. Besides, users can use the tool to extract files such as AR, ARJ, CAB, CHM, CPIO, CramFS, DMG, EXT, FAT, GPT, HFS, IHEX, ISO, LZH, LZMA, MBR, MSI. , NSIS, NTFS, QCOW2, RAR, RPM, SquashFS, UDF, UEFI, VDI, VHD, VMDK, WIM, XAR and Z.
To download and install the p7zip tool on Ubuntu Linux, use the following command:
sudo apt-get install p7zip-full p7zip-rarThe p7zip package installs a command line utility named 7z. Here is the syntax:
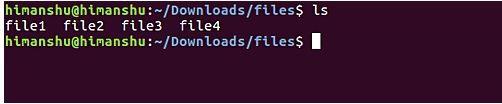
7z [adeltux] [-] [SWITCH] ...To begin, we first learn how to create an .7z archive using this command. Suppose you have a folder named files containing 4 files in it.
The task is to encapsulate these 4 files in a .7z file. To do this, enter your files directory into the command line and execute the following command:
$ 7z a files.7z *The screenshot below shows how the command is working:
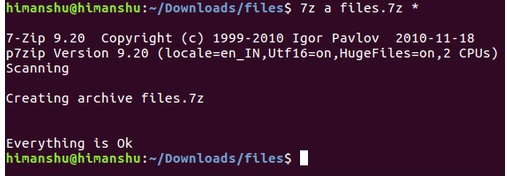
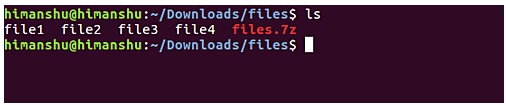
After the above command runs successfully, a file named files.7z will be created in your current working directory.
Suppose if you accidentally / intentionally deleted 4 files in the current files directory.
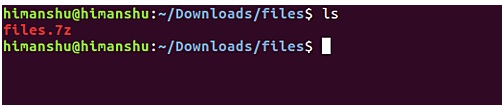
And you want to get back these files by unzipping the compressed .7z file you just created. To do this, use the "e" command line option as shown in the following command:
7z e files.7z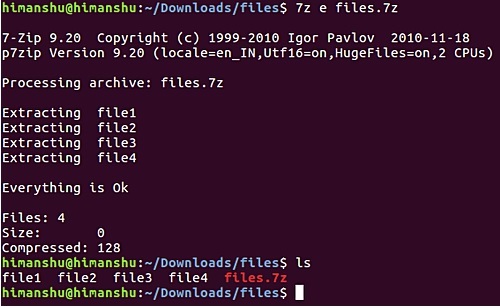
Above are the basic steps to create and extract a zipped file using 7z tool on Ubuntu Linux.
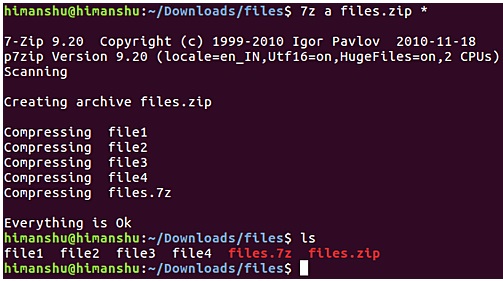
Next suppose if you need to create a .zip file. To do this, use the following command:
7z a [zipfile-name] [files-to-be-zipped]For example:
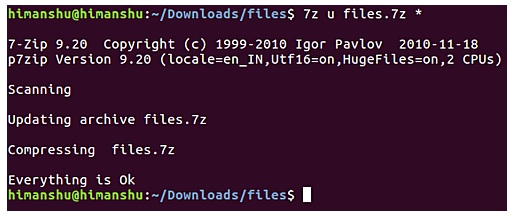
In addition, the 7zip tool also allows users to easily access compressed files (archive files) after creation. For example, suppose that you have just created a zip file and found that you need to add some files or directories to the archive. Instead of deleting the old zip file you just created and creating a new one, you just need to update the archive you just created with the files and folders you want to add.
For example, suppose the file directory contains a total of 5 text files and you want to add file5 to the compressed file.7z. To do this, use the "u" option in the 7zip command:
To confirm the compressed file has been updated, simply double-click on the file to open it. Alternatively you can do this via the command line, using the "l" option in the 7z command:
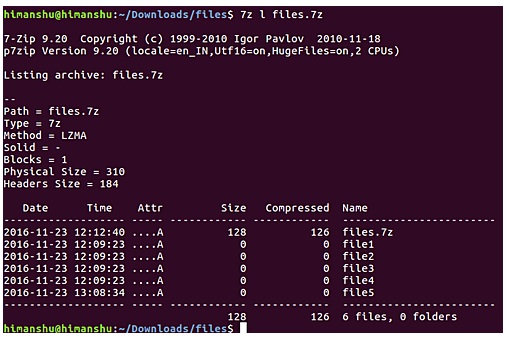
In the screenshot above, you can see the 7z command confirms that the compressed file.7z has just been updated with the new text file.
If you want to delete certain files in the compressed file created by 7z, you can also do this. In this case, we use the "d" command line option. The overall syntax of the command looks like this:
7z d [archive-name] [file-to-be-deleted]Note that you must add the "r" switch to the command in case the file in question is located in the compressed subdirectory.
Here are some important notes that you need to remember when using 7z utility:
- Do not use the 7-zip format for backup on Linux / Unix because 7-zip does not store users / groups of files.
- On Linux / Unix, to back up directories, you must use the tar command:
+ To back up a directory, use the command tar cf - directory | 7za a -si directory.tar.7z
+ To restore the backup, use the command: 7za x -so directory.tar.7z | tar xf -
- If you want to send files and directories (other than file owners) to other Unix / MacOS / Windows users, you can use the 7-zip format.
- Do not use the "r" option.
- Do not use the / * directory because the ". *" Files do not match the "/ .profile" folder).
Refer link: https://www.howtoforge.com/